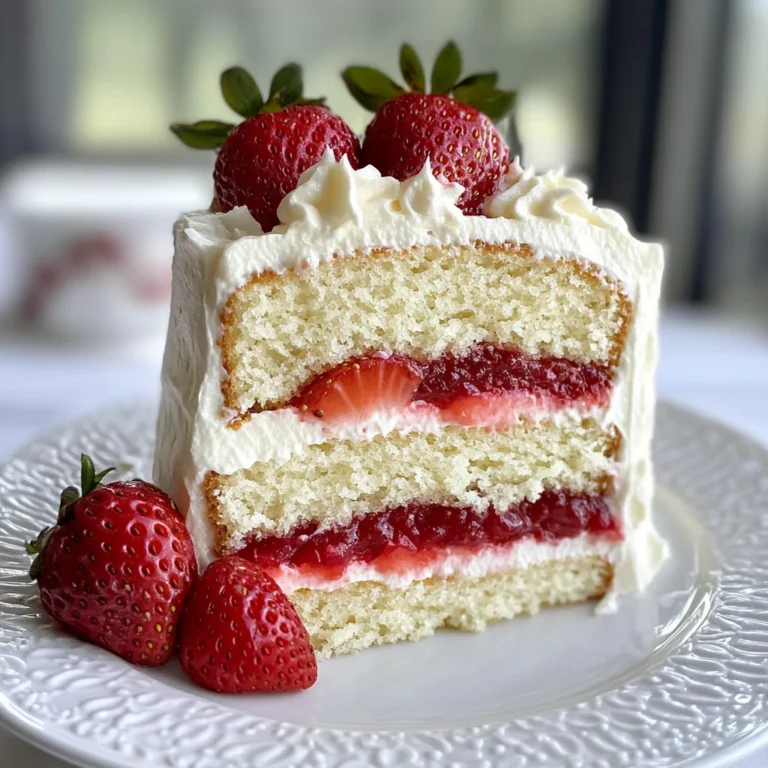
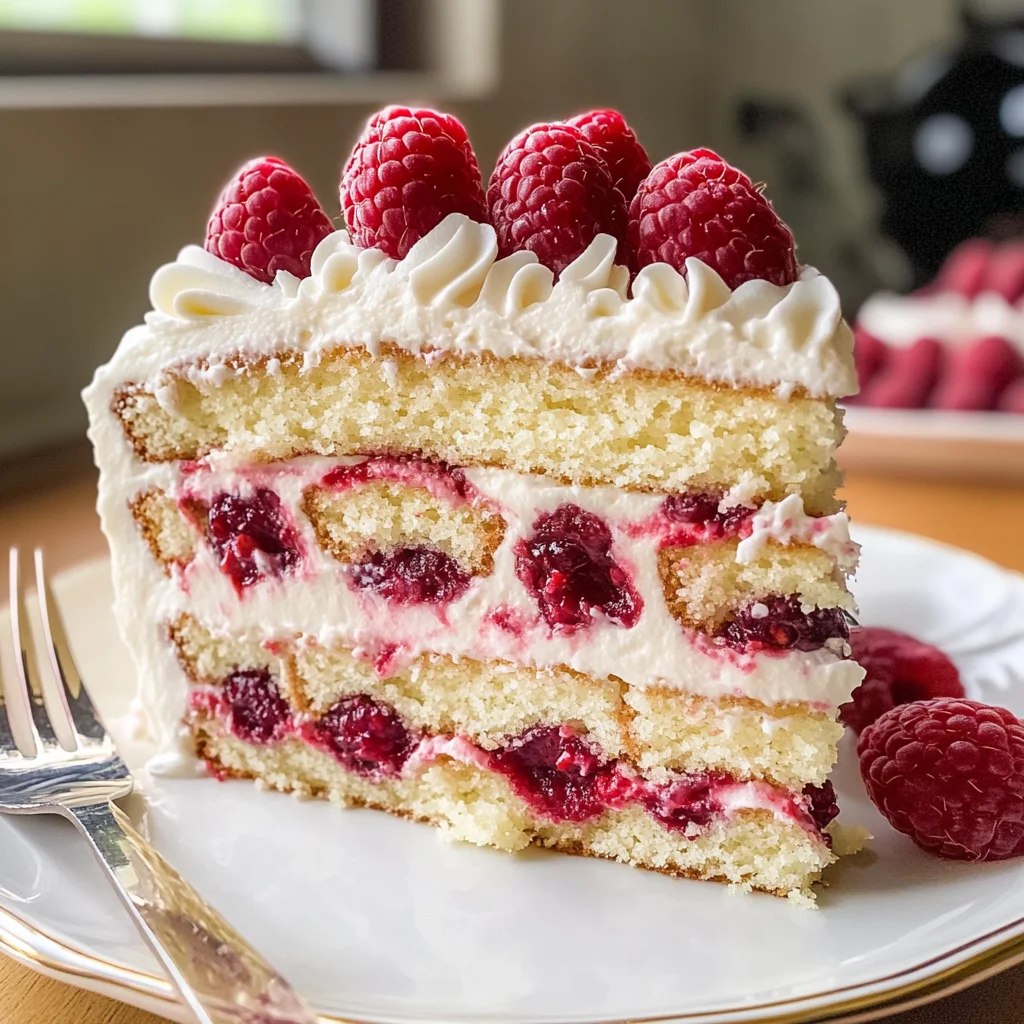
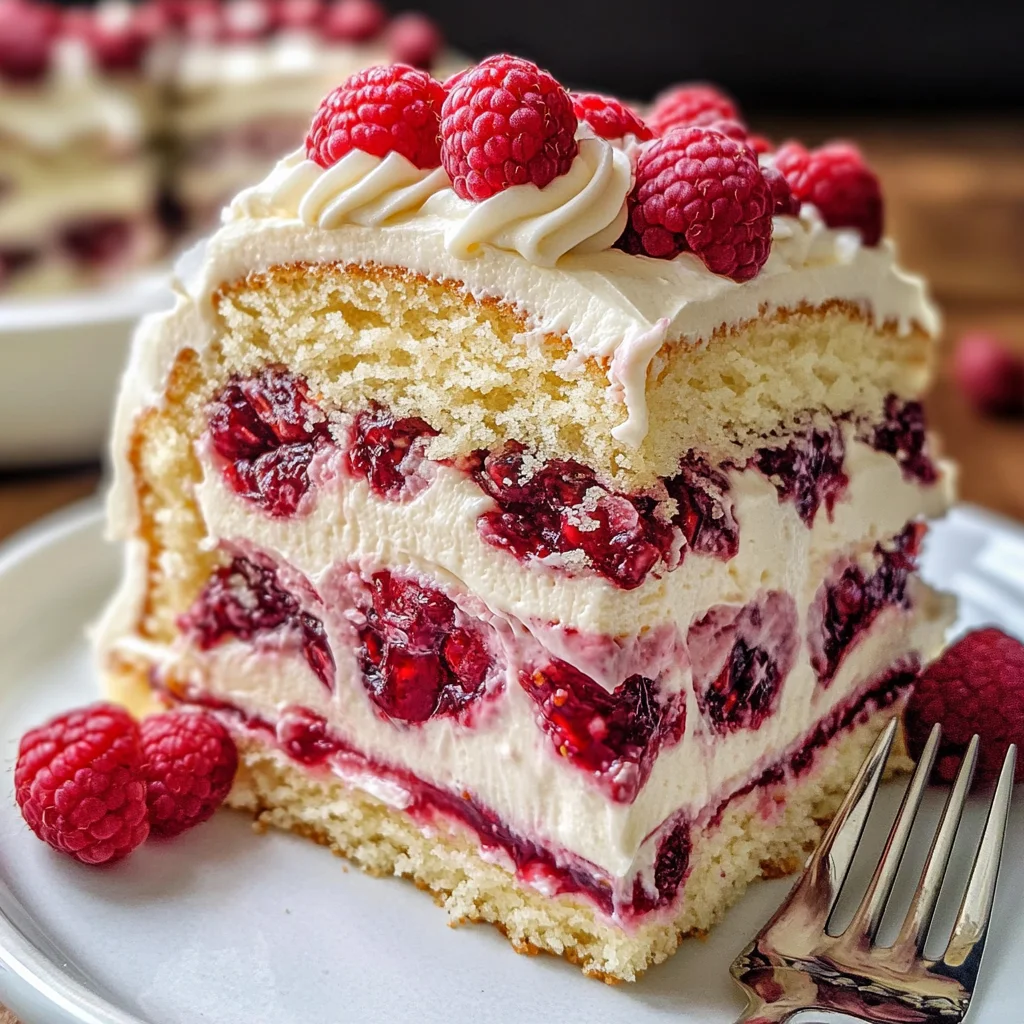
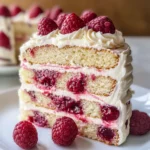
White Chocolate Raspberry Dream Cake
If you’re looking for a dessert that feels like a warm hug, look no further than this White Chocolate Raspberry Dream Cake. This cake is not just a feast for the eyes; it’s an indulgence for the taste buds too! The combination of rich white chocolate and tangy raspberries makes each bite simply unforgettable. Whether you’re celebrating a special occasion or just want to treat your family during a busy week, this cake fits perfectly into any moment.
What makes this recipe even more special is how easy it is to prepare. You can whip it up on a weekend and impress your friends at dinner parties, or you can make it ahead of time for a cozy family gathering. Trust me, when you serve this cake, everyone will be asking for seconds!
Why You’ll Love This Recipe
- Deliciously balanced flavors: The sweetness of white chocolate perfectly complements the tartness of raspberries.
- Easy to make: With straightforward steps and common ingredients, you’ll feel like a baking pro in no time!
- Great for any occasion: Whether it’s a birthday, holiday, or just because, this cake is always a hit.
- Impressive presentation: Layers of cake and vibrant raspberries make this dessert stunning on any table.
- Make-ahead friendly: Chill the cake in advance and serve it later for stress-free entertaining.
Ingredients You’ll Need
To create this delightful White Chocolate Raspberry Dream Cake, gather these simple and wholesome ingredients. Each one plays an important role in making your cake extraordinary!
For the Cake
- 2 1/2 cups all-purpose flour
- 2 teaspoons baking powder
- 1/2 teaspoon baking soda
- 1/2 teaspoon salt
- 1 cup unsalted butter
- 1 1/2 cups granulated sugar
- 4 large eggs
- 1 teaspoon vanilla extract
- 1 cup whole milk
- 1/2 cup sour cream
- 6 ounces white chocolate, melted
For the Filling
- 1 1/2 cups fresh raspberries
- 1/2 cup raspberry jam
For the Whipped Cream Topping
- 2 cups heavy whipping cream
- 2 tablespoons powdered sugar
- 1 teaspoon vanilla extract
Variations
This recipe is wonderfully flexible! Feel free to customize it to suit your taste or dietary preferences with these fun ideas:
- Add some zest: Incorporate lemon or lime zest into the batter for an extra zing.
- Swap the fruit: Use blueberries or strawberries instead of raspberries for a different flavor profile.
- Make it gluten-free: Substitute all-purpose flour with your favorite gluten-free blend.
- Change the frosting: Try cream cheese frosting instead of whipped cream for a richer taste.
How to Make White Chocolate Raspberry Dream Cake
Step 1: Preheat and Prepare Your Pans
First things first, preheat your oven to 350°F (175°C). Grease and flour two 9-inch round cake pans. This step ensures that your cakes will easily release from the pans once baked.
Step 2: Mix Dry Ingredients
In a medium-sized bowl, whisk together the all-purpose flour, baking powder, baking soda, and salt until well combined. This helps evenly distribute the leavening agents throughout your dry mix so that your cakes rise beautifully.
Step 3: Cream Butter and Sugar
In a large mixing bowl, cream together the unsalted butter and granulated sugar using an electric mixer on medium speed until light and fluffy. This should take about 3-4 minutes. Creaming incorporates air into the mixture, giving your cake that lovely light texture.
Step 4: Add Eggs and Vanilla
Next, add the eggs one at a time, beating well after each addition. Mix in the vanilla extract until fully incorporated. This adds richness and flavor to your batter!
Step 5: Combine Wet Ingredients
In another bowl, combine whole milk and sour cream. Stir until smooth—this mixture adds moisture to keep your cake tender.
Step 6: Mix Everything Together
Gradually add the dry ingredients to the butter mixture alternately with the milk and sour cream mixture. Start and end with dry ingredients. Beat gently on low speed until just combined—be careful not to overmix!
Step 7: Fold in White Chocolate
Gently fold in the melted white chocolate with a spatula until fully incorporated. This step adds that dreamy white chocolate flavor throughout your cake.
Step 8: Bake Your Cakes
Divide the batter evenly between prepared pans and smooth out tops with a spatula. Bake in preheated oven for 25-30 minutes until a toothpick comes out clean when inserted into the center.
Step 9: Cool Down
Once baked, remove cakes from oven and let cool in pans for about 10 minutes before turning them out onto wire racks to cool completely.
Step 10: Prepare Raspberry Filling
While cakes cool down, mash fresh raspberries in a bowl until they break down into small pieces. Stir in raspberry jam until well mixed—this filling adds zesty goodness between layers!
Step 11: Make Whipped Cream
Beat heavy whipping cream with powdered sugar and vanilla extract on high speed until stiff peaks form. This fluffy topping will crown your beautiful cake!
Step 12: Assemble Your Cake
Once cooled completely, place one layer on your serving platter. Spread raspberry filling evenly over it followed by a generous layer of whipped cream. Top with second layer gently pressing down.
Step 13: Frost & Garnish
Spread remaining whipped cream over top and sides of cake. For an eye-catching finish, garnish with fresh raspberries arranged beautifully on top.
Step 14: Chill Before Serving
Chill your masterpiece in refrigerator for at least an hour before slicing into it—this helps set those delightful layers together nicely.
Now serve up slices of this magnificent White Chocolate Raspberry Dream Cake at your next gathering! Enjoy every delicious bite!
Pro Tips for Making White Chocolate Raspberry Dream Cake
Creating the perfect White Chocolate Raspberry Dream Cake can be a delightful experience, and these pro tips will help ensure your cake is a showstopper!
- Use room temperature ingredients: This helps create a smoother batter, allowing for better incorporation of air, which leads to a lighter, fluffier cake.
- Don’t overmix the batter: Mixing too much can develop gluten in the flour, resulting in a dense cake. Aim for just combined when adding dry ingredients.
- Cool completely before frosting: If you frost while the cakes are still warm, the whipped cream may melt. Cooling allows for a lovely finish that holds its shape.
- Fresh raspberries add flavor and texture: Using fresh raspberries not only enhances the flavor but also adds a beautiful pop of color and texture to your cake.
- Chill before serving: A little time in the refrigerator allows the flavors to meld beautifully and makes cutting easier.
How to Serve White Chocolate Raspberry Dream Cake
Presenting your White Chocolate Raspberry Dream Cake can make it even more tempting! Here are some ideas to elevate your serving game.
Garnishes
- Fresh mint leaves: A few sprigs of mint not only add a vibrant green color but also bring a refreshing aroma that complements the dessert beautifully.
- Shaved white chocolate: Sprinkle some finely shaved white chocolate on top of the whipped cream for an elegant touch that mirrors the cake’s flavors.
Side Dishes
- Vanilla ice cream: The creamy sweetness of vanilla ice cream pairs wonderfully with the tartness of the raspberries and the richness of white chocolate.
- Berry compote: A warm berry compote made from mixed berries can be served alongside or drizzled over each slice, amplifying the fruity notes of the cake.
- Lemon sorbet: The bright, zesty flavor of lemon sorbet provides a refreshing contrast to the sweetness of the cake, making it an excellent palate cleanser.
- Coffee or tea: A cup of rich coffee or fragrant herbal tea can enhance your dessert experience by balancing out the sweet flavors with their warmth and depth.
Enjoy creating and sharing this delectable White Chocolate Raspberry Dream Cake with friends and family—it’s truly a treat that embodies joy!
Make Ahead and Storage
This White Chocolate Raspberry Dream Cake is a fantastic option for meal prep! You can easily make it ahead of time for special occasions or simply to enjoy throughout the week. Here’s how to store it properly:
Storing Leftovers
- Store any leftover cake in an airtight container at room temperature for up to 2 days.
- For longer freshness, refrigerate the cake, where it will last for about a week.
- If you have separate layers or components, wrap them individually in plastic wrap before storing.
Freezing
- To freeze the whole cake, wrap it tightly in plastic wrap followed by aluminum foil to prevent freezer burn.
- Alternatively, you can freeze individual slices by wrapping them in plastic wrap and placing them in a freezer-safe bag.
- The cake can be frozen for up to 3 months. Thaw overnight in the refrigerator before serving.
Reheating
- If you prefer your cake warm, preheat your oven to 350°F (175°C).
- Place the slice on a baking sheet and warm it in the oven for about 10-15 minutes.
- Avoid using a microwave as it may alter the texture of the whipped cream frosting.
FAQs
Here are some frequently asked questions about making this delightful White Chocolate Raspberry Dream Cake:
Can I use frozen raspberries in my White Chocolate Raspberry Dream Cake?
Yes, you can use frozen raspberries! Just make sure to thaw and drain them well before incorporating them into your filling to avoid excess moisture.
How can I make my White Chocolate Raspberry Dream Cake even more flavorful?
You can enhance the flavor by adding a splash of lemon juice to the raspberry filling or infusing the whipped cream with vanilla bean seeds for added richness.
Is there a substitute for heavy whipping cream in this recipe?
If you’re looking for a lighter alternative, you could use coconut cream or a non-dairy whipped topping suitable for cakes.
How do I prevent my cake layers from sticking?
Ensure that you properly grease and flour your cake pans before pouring in the batter. You could also use parchment paper circles at the bottom of your pans for easy removal.
Can I decorate my White Chocolate Raspberry Dream Cake ahead of time?
Absolutely! You can decorate the cake up to one day before serving. Just keep it refrigerated until you’re ready to serve.
Final Thoughts
I hope this White Chocolate Raspberry Dream Cake becomes a cherished recipe in your baking repertoire! It’s not only visually stunning but also offers an extraordinary blend of flavors that will delight anyone who takes a bite. Enjoy making this delicious cake, and don’t forget to share it with friends and family. Happy baking!
White Chocolate Raspberry Dream Cake
Experience the delightful fusion of rich white chocolate and tart raspberries with our White Chocolate Raspberry Dream Cake. This stunning dessert is perfect for any occasion, whether you’re celebrating a birthday, hosting a dinner party, or simply treating your family to something special during the week. Each slice offers a beautiful balance of flavors, complemented by fluffy whipped cream and vibrant raspberry filling that will leave everyone asking for seconds. With simple steps and accessible ingredients, this cake is not only easy to make but also an impressive centerpiece for your dessert table. Get ready to create a memorable treat that embodies joy in every bite!
- Prep Time: 20 minutes
- Cook Time: 30 minutes
- Total Time: 50 minutes
- Yield: Serves approximately 12 slices 1x
- Category: Dessert
- Method: Baking
- Cuisine: American
Ingredients
- 2 1/2 cups all-purpose flour
- 2 teaspoons baking powder
- 1/2 teaspoon baking soda
- 1/2 teaspoon salt
- 1 cup unsalted butter
- 1 1/2 cups granulated sugar
- 4 large eggs
- 1 teaspoon vanilla extract
- 1 cup whole milk
- 1/2 cup sour cream
- 6 ounces white chocolate, melted
- 1 1/2 cups fresh raspberries
- 1/2 cup raspberry jam
- 2 cups heavy whipping cream
- 2 tablespoons powdered sugar
Instructions
- Preheat the oven to 350°F (175°C) and grease two 9-inch round cake pans.
- Whisk together flour, baking powder, baking soda, and salt in a medium bowl.
- In a large bowl, cream together butter and sugar until light and fluffy.
- Add eggs one at a time along with vanilla extract; mix well.
- Combine milk and sour cream in another bowl; stir until smooth.
- Gradually add dry ingredients to the butter mixture alternately with the milk mixture until just combined.
- Fold in melted white chocolate gently.
- Divide batter between prepared pans and bake for 25-30 minutes until a toothpick comes out clean.
- Let cakes cool before preparing raspberry filling by mashing fresh raspberries and mixing with raspberry jam.
- Whip heavy cream with powdered sugar and vanilla until stiff peaks form.
- Assemble the cake by layering one cake, spreading raspberry filling, topping with whipped cream, then adding the second layer; frost sides and top with remaining whipped cream and fresh raspberries.
Nutrition
- Serving Size: 1 slice (100g)
- Calories: 360
- Sugar: 31g
- Sodium: 180mg
- Fat: 24g
- Saturated Fat: 14g
- Unsaturated Fat: 8g
- Trans Fat: 0g
- Carbohydrates: 34g
- Fiber: 1g
- Protein: 4g
- Cholesterol: 85mg