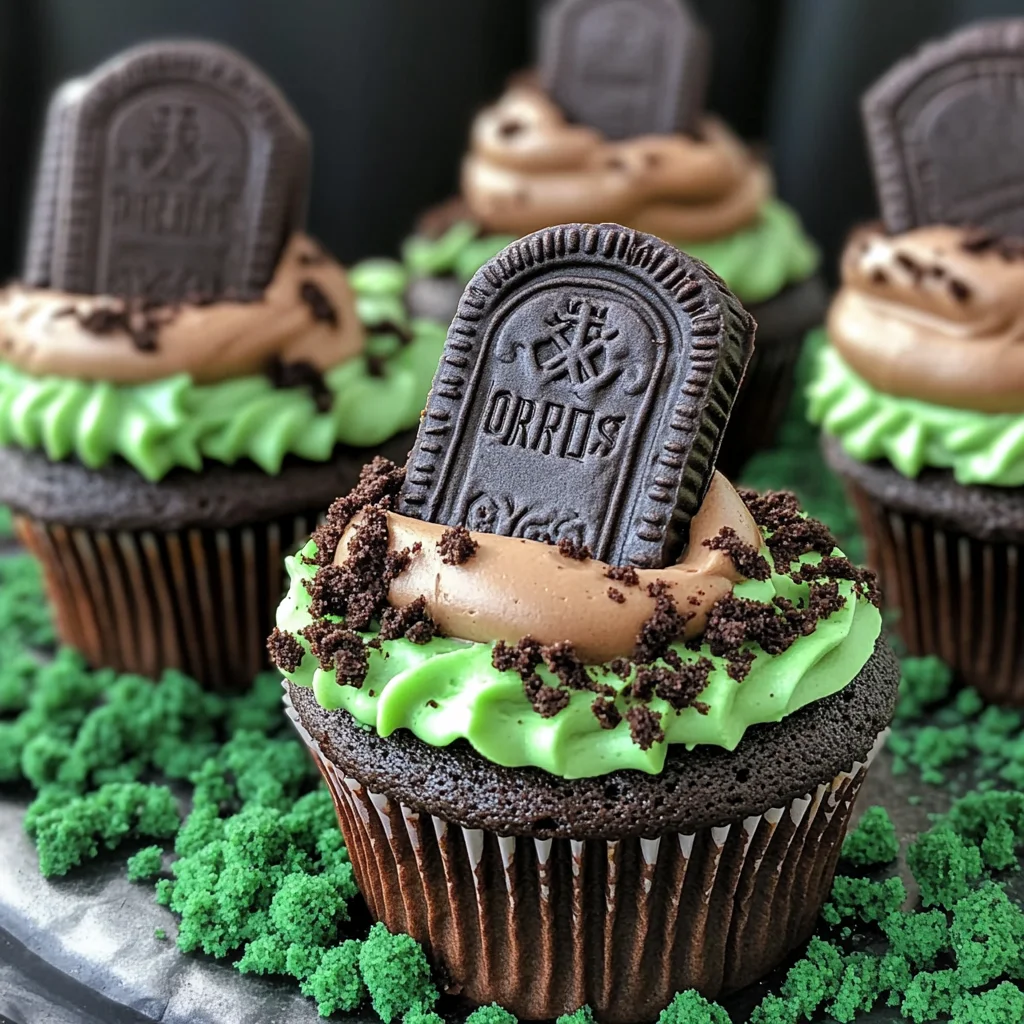
Halloween Graveyard Cupcakes
If you’re looking for the perfect treat to bring some spooky fun to your Halloween festivities, you’ve come to the right place! These Halloween Graveyard Cupcakes are not only a feast for the eyes but also a delight for the taste buds. With their rich chocolate flavor, creamy Oreo cheesecake filling, and creative decoration, they are sure to be a hit at any gathering. Whether you’re hosting a Halloween party or just want to surprise your family with something special, these cupcakes will do the trick!
What makes this recipe even more special is how easy it is to create these little graveyards. It’s a fantastic way to get kids involved in baking, and watching them decorate their own cupcakes can spark joy and creativity. So grab your apron and let’s get started!
Why You’ll Love This Recipe
- Fun and Festive: These Halloween Graveyard Cupcakes bring a playful twist to your dessert table. They’re sure to impress both kids and adults alike!
- Deliciously Decadent: With layers of rich chocolate cake and creamy Oreo filling, every bite is an indulgent treat that satisfies your sweet tooth.
- Easy to Make: The step-by-step instructions make this recipe approachable for bakers of all skill levels—no fancy techniques required!
- Perfect for Sharing: With twelve cupcakes in this batch, there’s plenty to go around for parties or family gatherings.
- Make-Ahead Friendly: You can prepare the elements ahead of time, making it simple to assemble when ready to serve.

Ingredients You’ll Need
To whip up these delightful cupcakes, you’ll need some simple, wholesome ingredients that you likely have on hand. Let’s gather everything we need for these spooky treats!
For the Cupcakes
- 12 Lotus biscoff biscuits
- 150 g Dark chocolate (melted)
- 30 g White chocolate (melted)
- 175 g Baking spread or butter (softened, unsalted)
- 175 g Caster sugar
- 3 Eggs (large)
- 2 tbsp Milk
- 150 g Self raising flour
- 25 g Cocoa powder
- 1/4 tsp Baking powder
For the Filling
- 115 g Full fat cream cheese
- 15 g Icing sugar
- 15 g Oreos (crushed)
- 1/8 tsp Vanilla extract
For the Chocolate Buttercream
- 100 g Butter (softened, unsalted)
- 165 g Icing sugar
- 35 g Cocoa powder
- 1-2 tsp Milk
For the Green Grass Buttercream
- 25 g Butter (softened, unsalted)
- 50 g Icing sugar
- 1/8 tsp Vanilla extract
- Green food colouring
- 35 g Oreos (crushed)
Variations
This recipe is quite flexible! Feel free to experiment with different flavors and decorations that suit your taste.
- Change the Filling: Swap out the Oreo cheesecake filling for a vanilla or strawberry cream cheese if you prefer a different flavor.
- Use Different Biscuits: Instead of Lotus biscoff biscuits for gravestones, try chocolate digestives or ginger snaps for an added spice!
- Add Toppings: Top your cupcakes with gummy worms or candy spiders for an extra creepy touch.
- Make Them Gluten-Free: Substitute self-raising flour with gluten-free flour if needed—just make sure it has a rising agent.
How to Make Halloween Graveyard Cupcakes
Step 1: Prepare Your Biscuit Graves
Start by making those cute biscuit graves! Snap about a third off each Lotus biscoff biscuit; this gives them a shorter profile that fits perfectly on top of your cupcakes. Melt the dark chocolate and dip each biscuit into it before placing them on baking paper to set. This adds a delicious coating and makes them look like real gravestones!
Step 2: Decorate Your Graves
Once your dark chocolate has set, melt the white chocolate and pour it into a piping bag. Pipe fun designs onto your biscuits—think spooky messages or simple patterns—and allow them to set again. These little details really make your cupcakes stand out!
Step 3: Bake Your Cupcakes
Preheat your oven to 140C Fan/160C/325F/Gas Mark 3 while you line your cupcake tin with cases. To prepare the sponge mixture, beat together the softened baking spread and caster sugar until fluffy—this usually takes about five minutes with an electric whisk. Adding air here ensures light and fluffy cupcakes!
Step 4: Mix in Eggs and Dry Ingredients
Once fluffy, mix in the eggs one at a time along with milk until well combined. Gently fold in self-raising flour, cocoa powder, and baking powder until just mixed—it’s important not to overwork the batter so that it stays tender.
Step 5: Bake & Cool
Distribute the batter evenly into cupcake cases—fill them about two-thirds full—and bake for 25-30 minutes until a skewer comes out clean. Once baked, let them cool completely on a wire rack because warm cupcakes might melt your filling!
Step 6: Make Oreo Cheesecake Filling
While waiting for those delicious cupcakes to cool down, prepare the Oreo cheesecake filling by mixing cream cheese with icing sugar and vanilla until smooth. Then fold in crushed Oreos—this adds texture and flavor that everyone will love!
Step 7: Core & Fill Your Cupcakes
Using either a cupcake corer or knife, make holes in each cooled cupcake’s center. Fill each hole with that yummy cheesecake mixture using either a spoon or piping bag—this hidden treasure will surprise everyone when they take their first bite.
Step 8: Create Chocolate Buttercream
Now it’s time for some frosting magic! In another bowl, beat together softened butter with cocoa powder and icing sugar until smooth; add milk as needed for desired consistency. This rich buttercream will top off your spooky creations perfectly!
Step 9: Make Green Grass Buttercream
For some grassy accents around those gravestones, mix together softened butter with icing sugar until smooth; add vanilla extract along with green food coloring until you reach that perfect shade of grass green.
Step 10: Assemble Your Cupcakes
Pipe generous amounts of chocolate buttercream onto each cupcake using a round nozzle—smooth it out if needed—and gently push one of those decorated biscuit graves into each one. Sprinkle crushed Oreos around as soil then finish off by piping green buttercream ‘grass’ around each grave.
Step 11: Enjoy!
Store any leftovers in an airtight container at room temperature for up to three days. These Halloween Graveyard Cupcakes are not just desserts; they’re little works of art meant to be enjoyed at gatherings or as festive treats throughout October!
Pro Tips for Making Halloween Graveyard Cupcakes
These spooky cupcakes are a fantastic treat for Halloween, and with a few handy tips, you can make them even more special!
- Use Quality Ingredients: Starting with high-quality chocolate and cream cheese will significantly enhance the flavor and texture of your cupcakes. It’s worth investing in good ingredients for the best results.
- Let Cupcakes Cool Completely: Make sure to let your chocolate cupcakes cool completely before filling them with the cheesecake mixture. This prevents melting and maintains the integrity of the filling.
- Piping Technique: For a professional look, use a piping bag fitted with different nozzles to create various textures. This technique not only looks great but also adds an exciting visual appeal to your cupcakes.
- Customize Your Decorations: Don’t be afraid to get creative with your graveyard scene! Use edible decorations like candy eyes or gummy worms to add personality to each cupcake.
- Make Ahead: These cupcakes can be made in advance! You can prepare the cupcakes and filling a day ahead, then assemble and decorate them on the day of your Halloween gathering for maximum freshness.
How to Serve Halloween Graveyard Cupcakes
Presenting your Halloween Graveyard Cupcakes in an inviting way can elevate their spooky charm. Here are some fun ideas to serve them up!
Garnishes
- Edible Glitter: Sprinkle some edible glitter over the top of your cupcakes for a magical sparkle that catches the eye.
- Candy Corn: Place a few pieces of candy corn around the base of each cupcake to add a pop of color and give that classic Halloween vibe.
Side Dishes
- Pumpkin Soup: A warm pumpkin soup makes for a delicious fall side dish that complements sweet treats beautifully. Its creamy texture pairs well with the richness of the cupcakes.
- Spooky Fruit Salad: Create a fruit salad using seasonal fruits like oranges, apples, and grapes. Add some gummy spiders for extra fun!
- Cheese Platter: Serve a variety of cheeses alongside crackers as a savory counterpart to your sweet cupcakes. This contrast is sure to please everyone’s palate.
- Caramel Apple Slices: Offer fresh apple slices drizzled with caramel sauce as another sweet treat that ties into the Halloween theme perfectly.
Enjoy making these deliciously eerie cupcakes, and have fun celebrating this spooky season!
Make Ahead and Storage
These Halloween Graveyard Cupcakes are not just a delight to make, but they’re also perfect for meal prep! You can prepare components in advance for a stress-free baking experience.
Storing Leftovers
- Store cupcakes in an airtight container at room temperature for up to 3 days.
- If you need to keep them longer, consider refrigerating them, but they may dry out slightly.
Freezing
- Freeze the cupcakes without frosting by placing them in a single layer on a baking sheet until solid, then transfer to an airtight container or freezer bag.
- They can be frozen for up to 2 months. Thaw in the fridge overnight before decorating.
Reheating
- If you prefer your cupcakes warm, preheat your oven to 150°C (300°F) and reheat for about 5-10 minutes.
- Alternatively, you can microwave individual cupcakes for about 10-15 seconds until warmed through.
FAQs
Here are some common questions about making Halloween Graveyard Cupcakes that might help you along your baking journey!
Can I use different fillings for my Halloween Graveyard Cupcakes?
Absolutely! While the oreo cheesecake filling is delicious, feel free to experiment with different flavors like pumpkin spice or even a fruit jam.
How do I achieve the best texture for my Halloween Graveyard Cupcakes?
To ensure light and fluffy cupcakes, avoid overmixing once you add the flour and cocoa powder. Gently fold them in until just combined!
Can I make Halloween Graveyard Cupcakes ahead of time?
Yes! You can prepare the cupcake batter and bake them a day in advance. Just store them properly until you’re ready to frost and decorate!
What’s the best way to decorate my Halloween Graveyard Cupcakes?
Use a piping bag for both the chocolate buttercream and green grass buttercream for an artistic touch. Don’t forget to have fun with it!
How long will my Halloween Graveyard Cupcakes last?
When stored correctly, these cupcakes will last up to 3 days at room temperature or longer if frozen without frosting.
Final Thoughts
I hope you find joy in creating these spooky yet scrumptious Halloween Graveyard Cupcakes! They not only taste amazing but also bring a whimsical touch to your Halloween celebrations. Enjoy every moment of baking and decorating, and I can’t wait for you to share this delightful treat with family and friends. Happy baking!
Halloween Graveyard Cupcakes

If you’re looking to add a sweet and spooky touch to your Halloween celebrations, these Halloween Graveyard Cupcakes are the perfect treat! With rich chocolate flavor and a creamy Oreo cheesecake filling, these delightful cupcakes are sure to impress. They’re not only visually striking with their graveyard decorations but also simple enough to make with the kids. Ideal for parties or family gatherings, these cupcakes will bring festive fun to your dessert table!
- Prep Time: 30 minutes
- Cook Time: 30 minutes
- Total Time: 1 hour
- Yield: 12 servings 1x
- Category: Dessert
- Method: Baking
- Cuisine: American
Ingredients
- 12 Lotus biscoff biscuits
- 150 g dark chocolate (melted)
- 175 g baking spread or unsalted butter (softened)
- 175 g caster sugar
- 3 large eggs
- 150 g self-raising flour
- 115 g full-fat cream cheese
- 100 g unsalted butter (for chocolate buttercream)
- Green food coloring (for grass buttercream)
Instructions
- Prepare biscuit graves by breaking and dipping Lotus biscoff biscuits in melted dark chocolate. Allow to set.
- Preheat oven to 140C Fan/160C/325F/Gas Mark 3 and line a cupcake tin.
- Beat softened baking spread and caster sugar until fluffy, then add eggs one at a time and milk.
- Fold in self-raising flour, cocoa powder, and baking powder gently.
- Distribute batter into cupcake cases and bake for 25-30 minutes until a skewer comes out clean. Cool completely.
- Make Oreo cheesecake filling by mixing cream cheese, icing sugar, vanilla, and crushed Oreos until smooth.
- Core cooled cupcakes and fill with the cheesecake mixture.
- Create chocolate buttercream by beating together unsalted butter, icing sugar, cocoa powder, and milk.
- Pipe chocolate buttercream onto each cupcake, insert the biscuit grave, and decorate with crushed Oreos and green buttercream.
Nutrition
- Serving Size: 1 cupcake (90g)
- Calories: 360
- Sugar: 28g
- Sodium: 180mg
- Fat: 20g
- Saturated Fat: 10g
- Unsaturated Fat: 8g
- Trans Fat: 0g
- Carbohydrates: 40g
- Fiber: 2g
- Protein: 4g
- Cholesterol: 60mg