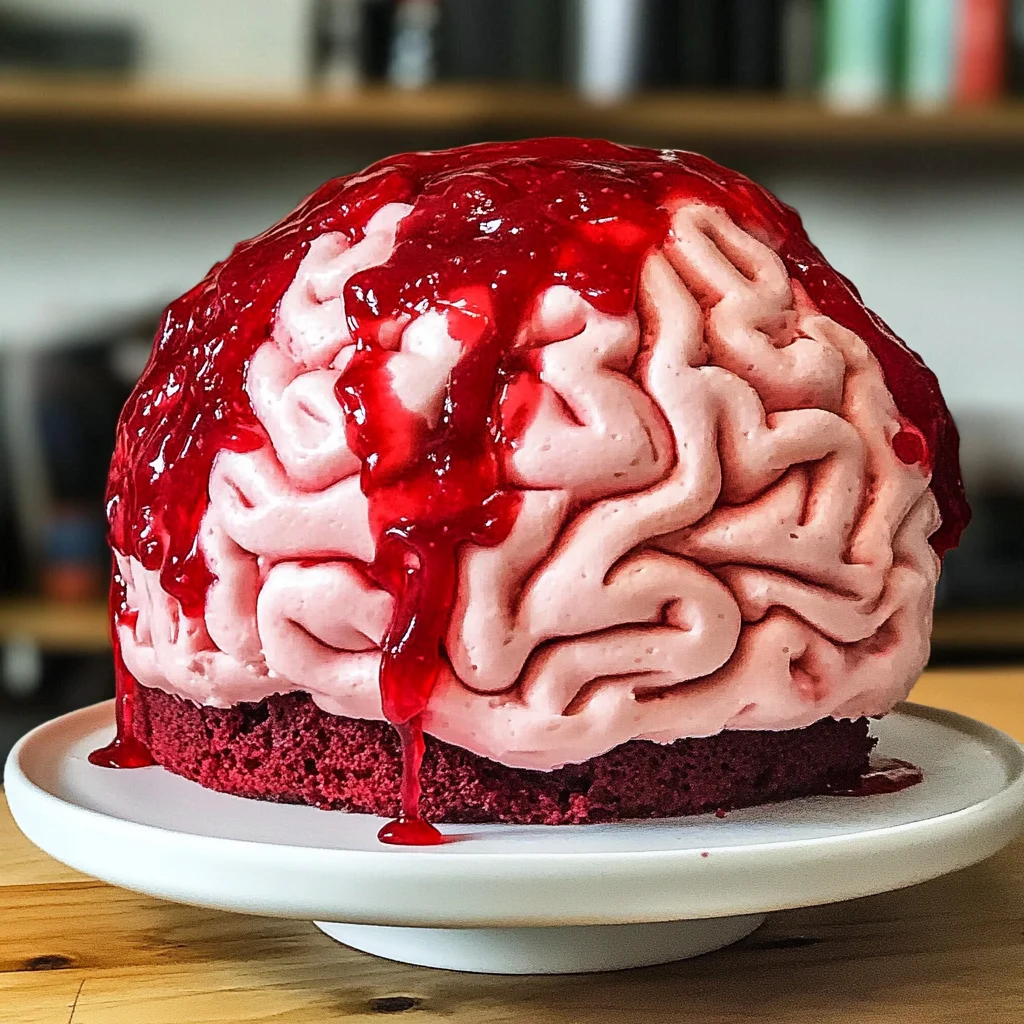
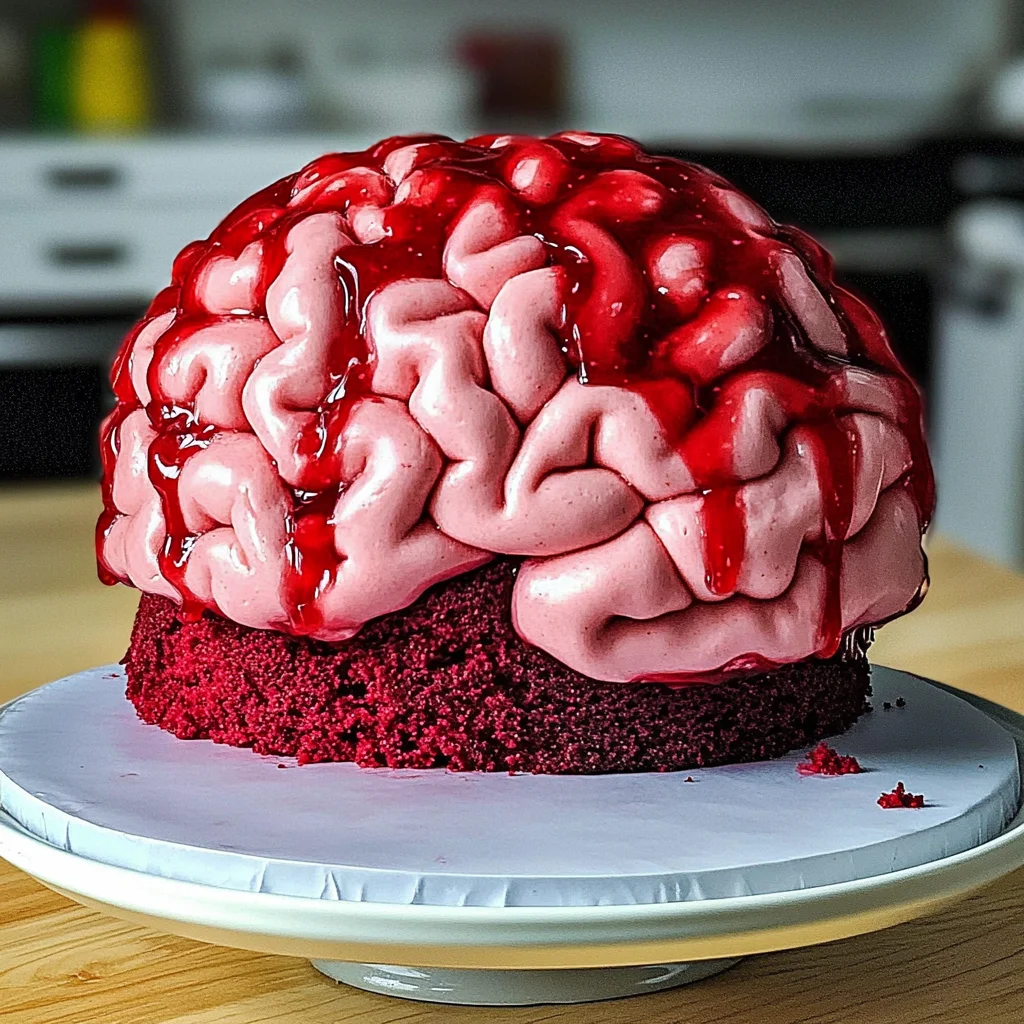
Brain Cake
If you’re looking for a show-stopping dessert that will impress your friends and family, look no further than this Brain Cake! Perfect for Halloween or any spooky gathering, it’s a delightful combination of moist red velvet cake, smooth pink buttercream, and a raspberry jam “blood” filling. This cake isn’t just about the looks; it’s packed with flavor and made from wholesome ingredients you can feel good about.
What makes this Brain Cake so special is not only its eerie design but also its versatility—whether you’re celebrating a birthday or just craving something fun, this cake fits right in. So roll up your sleeves and let’s get baking!
Why You’ll Love This Recipe
- Eye-catching design: The unique brain shape makes it a fantastic conversation starter at any party.
- Delicious flavors: With rich red velvet layers and sweet raspberry jam, every bite is a treat.
- Family-friendly fun: Get the kids involved in decorating; they’ll love helping to create this spooky masterpiece!
- Make-ahead option: Bake the cake layers in advance and frost them when you’re ready to serve, making party prep a breeze.
Ingredients You’ll Need
Gathering the ingredients for this Brain Cake is simple and fun! You’ll find everything you need right in your kitchen or at your local grocery store. Here are the wholesome ingredients that make this cake so delicious:
For the Cake
- 2 1/2 cups cake flour (300g)
- 2 Tbsp unsweetened cocoa powder, sifted (10g)
- 1 tsp baking soda (6g)
- 1/2 tsp fine salt (3g)
- 1/2 cup (1 stick) unsalted butter, room temperature (113g)
- 1 3/4 cups granulated sugar (350g)
- 2 large eggs, room temperature (112g)
- 1 1/4 cups buttermilk, room temperature (300g)
- 1/2 cup vegetable or canola oil (120g)
- 2 tsp vanilla extract or vanilla bean paste (8g)
- 1 tsp white vinegar (4g)
- 1 tsp red gel food coloring (or 1 Tbsp liquid food coloring)
For the Frosting
- 1 1/2 cups (3 sticks) unsalted butter, room temperature (339g)
- 1 cup (8 oz) full-fat cream cheese, room temperature (226g)
- 1 Tbsp vanilla extract or vanilla bean paste (12g)
- 1 tsp fine salt (6g)
- 7 cups powdered sugar (904g or a 2lb. bag)
- 3 Tbsp heavy whipping cream, room temperature (45g)
- Small squirt of red gel food coloring (or 1 tsp liquid food coloring)
For the Blood
- 1/2 cup seedless raspberry or strawberry jam
- 3 Tbsp water (45g)
- (Optional: 1/4 tsp red gel food coloring or 1 tsp liquid food coloring)
Variations
This Brain Cake recipe is wonderfully flexible! Here are some fun ideas to customize it:
- Swap the colors: Use different gel food colors to create a more vibrant cake with shades like blue or green!
- Change up the filling: Instead of raspberry jam, try strawberry or even cherry jam for a different twist.
- Add sprinkles: Mix in edible glitter or spooky sprinkles into the frosting for extra flair.
- Try other flavors: Mix things up by using chocolate cake instead of red velvet for a rich chocolate version.
How to Make Brain Cake
Step 1: Prepare the Cake Batter
Start by preheating your oven to 350°F (175°C). In a large mixing bowl, combine the dry ingredients: cake flour, cocoa powder, baking soda, and salt. Mixing these first ensures even distribution of the leavening agents. In another bowl, cream together the butter and sugar until light and fluffy. This step is crucial because it incorporates air into your batter for a lighter texture.
Step 2: Combine Wet Ingredients
Next, add the eggs one at a time to your butter-sugar mixture while mixing well after each addition. Then stir in buttermilk, oil, vanilla extract, vinegar, and red gel food coloring until fully combined. The acid from vinegar helps enhance the leavening process alongside baking soda while giving that lovely red color!
Step 3: Mix Dry and Wet Ingredients
Slowly add your dry mixture into your wet mixture in three parts. Mix just until combined; overmixing can lead to dense cakes. Pour the batter equally into prepared round cake pans and smooth out the tops.
Step 4: Bake Your Cakes
Bake in your preheated oven for about 27 minutes or until a toothpick inserted into the center comes out clean. Let them cool in their pans for about ten minutes before transferring them to wire racks to cool completely.
Step 5: Make Your Frosting
While your cakes cool down, whip together softened butter and cream cheese until creamy. Gradually add powdered sugar while mixing on low speed until combined; then add heavy whipping cream and beat until fluffy. Don’t forget to mix in that small squirt of red gel food coloring—it adds an extra spooky touch!
Step 6: Assemble Your Brain Cake
Once cakes are completely cooled, level them if necessary. Place one layer on your serving plate; spread raspberry jam on top followed by a generous layer of pink frosting. Add the second layer on top and frost all over with remaining pink buttercream.
Step 7: Final Touches
To create realistic blood effects, drizzle additional raspberry jam mixed with water on top of decorated frosting before serving! You can also use any leftover frosting to pipe decorations around.
Now you have an amazing Brain Cake ready to wow your friends at any spooky celebration! Enjoy every delicious bite!
Pro Tips for Making Brain Cake
Making a brain cake can be a fun and rewarding experience, especially when you have a few pro tips up your sleeve to ensure it turns out perfectly!
- Use room temperature ingredients: This helps create a smooth batter that mixes evenly, resulting in a moist and fluffy cake.
- Sift your dry ingredients: Sifting ensures that there are no lumps in your flour or cocoa powder, leading to a more consistent texture in your cake.
- Don’t overmix the batter: While it’s tempting to mix until everything is combined, overmixing can lead to a dense cake. Mix just until you see no dry ingredients.
- Chill your buttercream: After making your pink buttercream, chilling it for about 15-20 minutes allows it to firm up, making it easier to pipe those intricate brain details.
- Experiment with colors: If you want a more vibrant look for your cake, feel free to adjust the amount of red gel food coloring. Just remember, a little goes a long way!
How to Serve Brain Cake
Presenting your brain cake is just as important as making it! With a few creative touches, you can elevate its spooky appeal for Halloween gatherings or themed parties.
Garnishes
- Fresh raspberries: Their bright color and tartness complement the sweetness of the cake and add an extra touch of Halloween flair.
- Chocolate shavings: Sprinkle some on top for an elegant finish that contrasts beautifully with the pink buttercream.
- Edible glitter: A light dusting of edible glitter can create an eerie yet enchanting effect that’s perfect for any spooky celebration.
Side Dishes
- Ghostly meringues: Light and airy, these treats are easy to make and add a fun ghostly touch to your dessert table.
- Pumpkin spice cupcakes: These cozy fall treats bring warmth and flavor balance to the sweetness of the brain cake.
- Spooky fruit skewers: Thread together seasonal fruits like grapes, melon, and strawberries on skewers for a refreshing side that adds color and nutrition.
- Witch’s brew punch: A fun beverage option that can be made with fruit juices and soda water; serve it in a cauldron for added flair!
With these tips and serving suggestions, you’ll not only impress your guests with this Halloween-themed brain cake but also create an unforgettable experience centered around delicious flavors and festive decor! Enjoy baking!
Make Ahead and Storage
This Brain Cake is not only a showstopper for your Halloween festivities, but it’s also perfect for meal prep! You can make it ahead of time and store it properly to enjoy later. Let’s dive into the best ways to keep your cake fresh.
Storing Leftovers
- Allow the cake to cool completely before storing.
- Wrap individual slices tightly in plastic wrap or aluminum foil.
- Store the wrapped slices in an airtight container at room temperature for up to 3 days.
- If you prefer, you can refrigerate the cake, which will extend its freshness for about a week.
Freezing
- To freeze the entire cake, ensure it’s completely cooled and wrapped tightly in plastic wrap.
- Place the wrapped cake in a freezer-safe container or bag to prevent freezer burn.
- It can be frozen for up to 3 months.
- For individual slices, wrap them similarly and store them in an airtight container.
Reheating
- To enjoy your cake warm, remove it from the freezer and let it thaw overnight in the refrigerator.
- Bring it to room temperature before serving, or gently microwave individual slices for about 10-15 seconds until warmed through.
- Avoid overheating to maintain the texture of the buttercream.
FAQs
If you have some questions about making this delightful Brain Cake, you’re not alone!
How do I make a Brain Cake without fondant?
You can easily create a stunning Brain Cake without fondant by using pink buttercream for decoration. Pipe the buttercream onto your red velvet layers to mimic brain textures. Remember, this method is not only simple but also delicious!
What are some fun ideas for decorating my Brain Cake?
For decoration ideas, consider adding edible decorations like gummy worms or chocolate spiders on top. You can also drizzle raspberry jam over portions of the cake for an extra “bloody” effect that enhances its Halloween theme!
Can I use a different flavor instead of red velvet for my Brain Cake?
Absolutely! While red velvet is traditional, feel free to experiment with other flavors like chocolate or vanilla. Just make sure your color scheme fits the spooky aesthetic!
How do I ensure my Brain Cake stays moist?
To keep your Brain Cake moist, make sure not to overbake it. Using buttermilk adds moisture, so stick with that ingredient and store your cake properly as mentioned earlier.
Final Thoughts
I hope you find joy in creating this unique Brain Cake! It’s a fantastic way to impress guests at any Halloween gathering while being simple enough for home bakers of all levels. Enjoy every step of the process—from mixing ingredients to decorating. I can’t wait for you to give it a try; happy baking!
Brain Cake
Create a spooky yet delicious Brain Cake that’s perfect for Halloween! Follow our easy recipe and impress everyone at your next celebration.
- Prep Time: 30 minutes
- Cook Time: 27 minutes
- Total Time: 57 minutes
- Yield: Serves approximately 12 slices 1x
- Category: Dessert
- Method: Baking
- Cuisine: American
Ingredients
- 2 1/2 cups cake flour
- 2 Tbsp unsweetened cocoa powder
- 1 tsp baking soda
- 1/2 tsp fine salt
- 1/2 cup unsalted butter, room temperature
- 1 3/4 cups granulated sugar
- 2 large eggs, room temperature
- 1 1/4 cups buttermilk, room temperature
- 1/2 cup vegetable or canola oil
- 2 tsp vanilla extract or vanilla bean paste
- 1 tsp white vinegar
- 1 tsp red gel food coloring
- 1 1/2 cups unsalted butter, room temperature (for frosting)
- 1 cup full-fat cream cheese, room temperature
- 1 Tbsp vanilla extract or vanilla bean paste (for frosting)
- 1 tsp fine salt (for frosting)
- 7 cups powdered sugar (for frosting)
- 3 Tbsp heavy whipping cream, room temperature (for frosting)
- Small squirt of red gel food coloring (for frosting)
- 1/2 cup seedless raspberry or strawberry jam (for blood)
- 3 Tbsp water (for blood)
- Optional: 1/4 tsp red gel food coloring or 1 tsp liquid food coloring (for blood)
Instructions
- Preheat the oven to 350°F (175°C).
- In a bowl, mix together the flour, cocoa powder, baking soda, and salt.
- In another bowl, cream the butter and sugar until fluffy; add eggs one at a time, then mix in buttermilk, oil, vanilla extract, vinegar, and red food coloring.
- Combine dry ingredients with wet ingredients gradually; pour into prepared cake pans.
- Bake for about 27 minutes or until a toothpick comes out clean; cool completely.
- To make frosting, beat together softened butter and cream cheese; gradually add powdered sugar until fluffy.
- Assemble the cake by layering with raspberry jam and frosting before decorating.
Nutrition
- Serving Size: 1 slice (100g)
- Calories: 360
- Sugar: 42g
- Sodium: 200mg
- Fat: 17g
- Saturated Fat: 8g
- Unsaturated Fat: 8g
- Trans Fat: 0g
- Carbohydrates: 50g
- Fiber: 0g
- Protein: 3g
- Cholesterol: 30mg