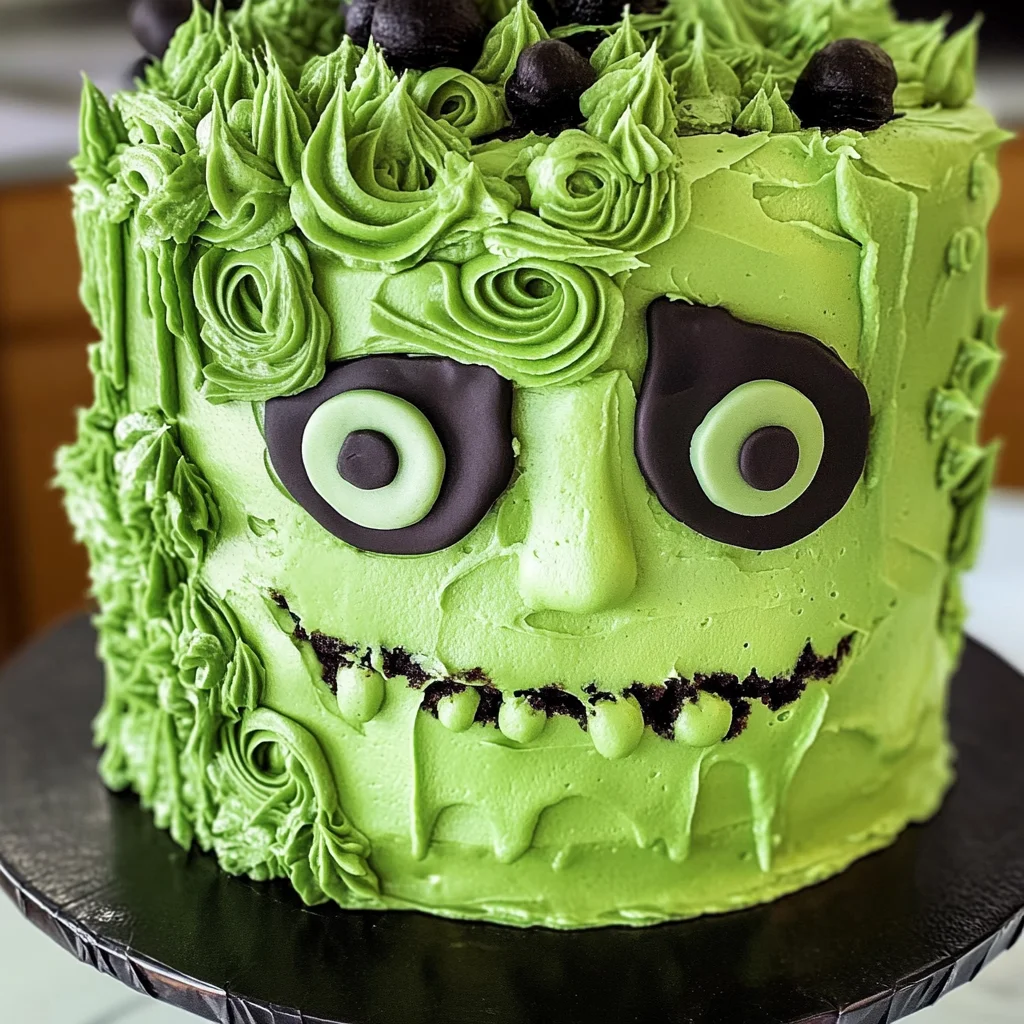
Frankenstein Cake
If you’re looking for a show-stopping dessert that will delight kids and adults alike this Halloween, let me introduce you to my beloved Frankenstein Cake! This cake is not just about its spooky appearance; it’s made with deliciously moist green velvet cake layers paired with a creamy buttercream that’s hard to resist. The vibrant color and playful design make it a perfect centerpiece for your Halloween parties or family gatherings. Whether you’re baking for a school event or just want to create a festive treat at home, this cake is sure to bring smiles all around.
What makes this Frankenstein Cake special is how simple it is to put together. You don’t need to be a professional baker to create something magical! This recipe allows you to get creative while enjoying quality time in the kitchen. Plus, who wouldn’t want a slice of this fun and festive dessert?
Why You’ll Love This Recipe
- Easy Preparation: With straightforward steps, you can whip up this cake without any fuss, making it perfect for busy weeknights.
- Family-Friendly Fun: Kids will love helping you decorate this spooky delight, turning baking into a fun family activity!
- Make-Ahead Convenience: You can bake the cake layers in advance and assemble them later, saving time on the day of your gathering.
- Delicious Flavor: The combination of rich green velvet cake and cream cheese buttercream is simply irresistible.
- Impressive Presentation: This cake looks amazing on any table, making it the ultimate showstopper at your Halloween celebration.

Ingredients You’ll Need
Let’s gather some simple, wholesome ingredients that come together to create this delightful Frankenstein Cake. Each element plays an important role in forming the moist texture and delicious flavor you’ll love.
For the Cake Layers
- 2 1/2 cups cake flour (300g)
- 2 Tbsp unsweetened cocoa powder, sifted (10g)
- 1 tsp baking soda (6g)
- 1/2 tsp fine salt (3g)
- 1/2 cup unsalted butter, room temperature (113g)
- 1 3/4 cups granulated sugar (350g)
- 2 large eggs, room temperature (112g)
- 1 1/4 cups buttermilk, room temperature (300g)
- 2/3 cup vegetable or canola oil (145g)
- 2 squirts of green gel food coloring (or 1 Tbsp liquid food coloring)
- 2 tsp vanilla extract or vanilla bean paste (8g)
- 1 tsp white vinegar (4g)
For the Cream Cheese Buttercream
- 1 1/2 cups unsalted butter, room temperature (339g – 3 sticks)
- 1/2 cup full-fat cream cheese, room temperature (113g or 4 oz.)
- 1 Tbsp vanilla extract or vanilla bean paste (12g)
- 1 tsp fine salt (6g)
- 8 cups powdered sugar (1000g)
- 2 Tbsp heavy whipping cream, room temperature (30g)
For Decoration
- Electric Green Gel Food Coloring
- Black Gel Food Coloring
Baking Tools
You will also need:
* 10-inch greaseproof cake board
* Spinning Cake Stand
* Small offset spatula
* 1 Large Piping Bag
* 3 Small Piping Bags
* 2 Large Round Piping Tips (like a Wilton 2A)
* 1 Small Round Piping Tip (like a Wilton 12)
* 1 Tiny Piping Tip (like a Wilton 3)
Variations
This Frankenstein Cake recipe is wonderfully flexible! Here are some fun variations to try:
- Add Some Texture: Incorporate chopped nuts into the batter for a delightful crunch.
- Flavor Twist: Swap out the vanilla for almond extract in the frosting for an extra layer of flavor.
- Color Change: Use different colors of food coloring to create other spooky designs—think mummies or monsters!
- Cupcake Version: Make mini cupcakes instead of one large cake for individual treats at your party.
How to Make Frankenstein Cake
Step 1: Prepare Your Cake Batter
Start by preheating your oven to 350°F (175°C). Grease and line your cake pans with parchment paper. In a mixing bowl, whisk together your dry ingredients: flour, cocoa powder, baking soda, and salt. This step ensures that everything is evenly distributed before adding wet ingredients.
Step 2: Mix Wet Ingredients
In another bowl, beat together the butter and sugar until light and fluffy. Add in the eggs one at a time, mixing well after each addition. Then, stir in the buttermilk, oil, food coloring, vanilla extract, and vinegar. These wet ingredients will make your cake moist and flavorful!
Step 3: Combine Dry and Wet Ingredients
Gradually add your dry mixture into the wet mix until just combined. Be careful not to overmix; we want our cake tender and soft! Once ready, divide the batter evenly among your prepared pans.
Step 4: Bake Your Cakes
Bake in your preheated oven for about 28 minutes or until a toothpick comes out clean when inserted into the center. Let them cool in pans for about ten minutes before transferring them onto wire racks to cool completely.
Step 5: Make Your Cream Cheese Buttercream
While your cakes are cooling down, whip up that delicious cream cheese buttercream! Beat together softened butter and cream cheese until smooth. Gradually add powdered sugar followed by heavy cream until you reach your desired consistency.
Step 6: Assemble Your Frankenstein Cake
Once your layers are completely cool, place one layer on your greaseproof cake board. Spread an even layer of buttercream on top before adding the second layer. Repeat this process until all layers are stacked!
Step 7: Decorate with Frosting
Using your piping bags fitted with different tips, get creative with decorating! Use green frosting for the base coat and black frosting for detailing like bolts or hair on Frankenstein’s head.
With these steps complete, you’ll have created an impressive Frankenstein Cake that’s ready to impress at any celebration! Enjoy every slice of this spooky sweetness!
Pro Tips for Making Frankenstein Cake
Making a spooky and delicious Frankenstein cake can be a delightful experience, especially with a few handy tips!
- Measure Ingredients Accurately: Precise measurements ensure your cake layers rise perfectly and maintain that lovely moist texture. Using a kitchen scale can help for the best results.
- Room Temperature Ingredients: Allowing your butter, eggs, and buttermilk to reach room temperature helps them blend more smoothly, creating a lighter, fluffier cake.
- Don’t Overmix the Batter: Mixing just until combined prevents the development of too much gluten, resulting in a tender crumb instead of a dense cake.
- Chill Your Cake Layers: After baking, let your cake layers cool completely before frosting. Chilling them in the fridge for about an hour makes handling and decorating much easier.
- Use Gel Food Coloring: Gel food coloring provides vibrant color without adding extra liquid to your batter. This is especially important in achieving that perfect green hue for Frankenstein’s skin!
How to Serve Frankenstein Cake
Presenting your Frankenstein cake can be as fun as making it! Here are some creative ways to serve this festive dessert that will impress your friends and family.
Garnishes
- Edible Eyes: Use candy eyes or chocolate chips to create fun expressions on your Frankenstein cake. They add a playful touch that kids will love!
- Chocolate Sprinkles: A sprinkle of chocolate can resemble hair on top of the cake, giving it an extra spooky vibe while complementing the rich flavors.
Side Dishes
- Pumpkin Spice Ice Cream: This seasonal treat pairs beautifully with the sweet and tangy cream cheese buttercream, adding a cozy autumn flavor.
- Apple Cider: A warm cup of apple cider balances the sweetness of the cake and adds a seasonal touch that’s perfect for fall gatherings.
- Caramel Sauce: Drizzling warm caramel sauce over each slice enhances the flavor profile and adds an indulgent element that everyone will enjoy.
- Whipped Coconut Cream: For a dairy-free option, whipped coconut cream provides a light and fluffy accompaniment that complements the dense texture of the cake perfectly.
With these tips and serving suggestions, you’re all set to create an unforgettable Halloween celebration with your delightful Frankenstein cake! Enjoy every bite!
Make Ahead and Storage
This Frankenstein Cake is not only a showstopper but also perfect for meal prep. You can bake the layers in advance and store them, making it easy to assemble right before your Halloween gathering!
Storing Leftovers
- Allow the cake to cool completely.
- Wrap the cake layers tightly in plastic wrap or store them in an airtight container.
- Place the wrapped cake in the fridge if you plan to eat it within a few days or in the freezer for longer storage.
Freezing
- To freeze, wrap each layer of cake individually in plastic wrap and then in aluminum foil.
- Label with the date and type of cake for easy identification.
- Freeze for up to 3 months. When ready to use, thaw overnight in the refrigerator.
Reheating
- If you prefer your cake slightly warm, preheat your oven to 350°F (175°C).
- Remove any plastic wrap and place the cake on a baking sheet.
- Heat for about 10-15 minutes, checking often until just warmed through.
FAQs
Here are some common questions about making this delightful Frankenstein Cake.
Can I make a gluten-free Frankenstein Cake?
Absolutely! You can substitute the all-purpose flour with a gluten-free flour blend. Just ensure that it’s a one-to-one substitute designed for baking.
How can I decorate my Frankenstein Cake?
You can use black and green gel food coloring to create fun designs. Use piping bags with different tips to add details like eyes, stitches, and scars to make your Frankenstein Cake come alive!
What is the best way to serve a Frankenstein Cake?
Slice the cake into generous wedges so everyone gets a piece of this festive treat. It’s perfect for Halloween parties or as a spooky dessert after dinner!
How long will my Frankenstein Cake last?
When stored properly in an airtight container, your decorated Frankenstein Cake will stay fresh for about 4-5 days in the refrigerator.
Final Thoughts
I hope you have as much fun making this whimsical Frankenstein Cake as I did! It’s such a unique dessert that brings joy and creativity to any Halloween celebration. Whether you’re sharing it with friends or enjoying it at home, this cake is sure to impress. Happy baking, and enjoy every delicious bite!
Frankenstein Cake
Get ready to impress your guests this Halloween with a delightful Frankenstein Cake! This vibrant green velvet cake is paired with creamy, irresistible buttercream that will enchant both kids and adults alike. Perfect for parties, this easy-to-make dessert not only boasts a spooky appearance but also offers an unforgettable flavor. Whether you’re hosting a Halloween bash or looking to create a festive treat at home, this cake is sure to be the star attraction. With simple preparation steps and lots of room for creativity, baking can become a fun family activity as you bring this playful monster to life!
- Prep Time: 20 minutes
- Cook Time: 28 minutes
- Total Time: 48 minutes
- Yield: Approximately 12 servings 1x
- Category: Dessert
- Method: Baking
- Cuisine: American
Ingredients
- 2 1/2 cups cake flour
- 2 Tbsp unsweetened cocoa powder
- 1 tsp baking soda
- 1/2 tsp fine salt
- 1/2 cup unsalted butter, room temperature
- 1 3/4 cups granulated sugar
- 2 large eggs, room temperature
- 1 1/4 cups buttermilk, room temperature
- 2/3 cup vegetable or canola oil
- 2 squirts of green gel food coloring
- 2 tsp vanilla extract
- 1 tsp white vinegar
- 1 1/2 cups unsalted butter, room temperature (for buttercream)
- 1/2 cup full-fat cream cheese, room temperature
- 1 Tbsp vanilla extract
- 1 tsp fine salt
- 8 cups powdered sugar
- 2 Tbsp heavy whipping cream, room temperature
- Electric Green Gel Food Coloring
- Black Gel Food Coloring
Instructions
- Preheat your oven to 350°F (175°C). Grease and line your cake pans.
- In a bowl, whisk together flour, cocoa powder, baking soda, and salt.
- In another bowl, beat the butter and sugar until fluffy. Add eggs one at a time, then mix in buttermilk, oil, food coloring, vanilla extract, and vinegar.
- Gradually combine the dry ingredients with the wet mixture until just mixed.
- Divide the batter among prepared pans and bake for about 28 minutes or until a toothpick comes out clean.
- Cool in pans for ten minutes before transferring to wire racks.
- For frosting, beat together butter and cream cheese until smooth. Gradually add powdered sugar and heavy cream until desired consistency is reached.
- Assemble cooled layers with buttercream between them and decorate as desired.
Nutrition
- Serving Size: 1 slice (90g)
- Calories: 370
- Sugar: 40g
- Sodium: 180mg
- Fat: 17g
- Saturated Fat: 8g
- Unsaturated Fat: 9g
- Trans Fat: 0g
- Carbohydrates: 50g
- Fiber: 0g
- Protein: 3g
- Cholesterol: 30mg